Monday, June 24, 2013

Money Saving Monday #26


Hobby Lobby

  • Select Home Accents up to 80% off!
  • Spring Items 66% off

Jo-Ann Fabric

  • 50% off Home Decor Outdoor Fabric
  • 25% off Entire Stock Fabric
  • 40% off Cardcrafting & Papercrafting Supplies & Tools

Michaels

  • Papercrafting Tools, buy one get one 50% off


Monday, June 17, 2013

Money Saving Monday #25

Hobby Lobby

  • Wood Decor & Metal Decor 50% off
  • Ribbon & Trims by the roll 50% off
  • Spring & Summer items 50% off
Jo-Ann Fabric

  • Caron One Pound Yarn $6.79
  • Duck Canvas $7.69/yd

Michaels

  • $0.77 Americana Acrylic Paint
  • 2 for $7 12" x 12" Value Pack Paper

Thursday, June 13, 2013

Ebates.com really does work!

Typically I post ways to save money and/or coupons on Mondays. But I figured I should take time today to post this and let you in on a little secret ;-)  I originally saw Ebates.com on the KrazyKoupon Lady's blog, and figured I would give it a try since I buy the majority of my clothing, and quite a bit of my craft supplies online.

How it works:
  • Start an account in less than a minute with no sensitive information required.
  • Go to the Ebates website to view their partner list of over 1,500 major retailers nationwide. Each store lists a cash back percentage to shoppers - average cash back is from 4%-12%. 
  • Follow the link to the store you want, and shop as normal. {Google Chrome has a plug-in so it automatically notifies you when you're shopping at site that is a partner, no need to go to the Ebates site first}.
  • Cash back automatically accrues in an Ebates account until a minimum of $5.01 is reached. At least four times a year, Ebates mails a check or transfers those funds into a PayPal account. No strings, no points to redeem, no mail-in forms or membership fees.
BONUS:
  • Ebates also gives new members a free $10.00 to the retailer of their choice for signing up and making their first purchase of at least $25.00!
So what do you have to lose? I think you should try it out and sign up today! 

Wednesday, June 12, 2013

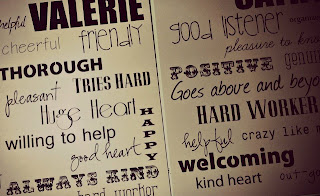
Tutorial: Subway Art made with Photoshop

Subway Art is super popular right now! You can find cute sayings to print and frame all over the web, but sometimes it just doesn't fit the bill and you need to make your own. I love making Subway art. It's actually quite simple once you get the hang of it, and it is a great personal touch to any space.

To start, you definitely don't need Photoshop (you can use Word, Paint, etc.) but for this tutorial I am going to show you how I make it with Photoshop. Click on the images below to see the text larger!

Step 1:
Open up the Photoshop program, and click File > New. When the screen pops up, you can name your printable, then choose what size you want it to be. I do all different sizes of Subway Art, and depending on your printer (or availability of printing larger sizes) you can make virtually any size your mind desires! Make sure you set your resolution to 300 pixels/inch, then click OK.

Step 2:
I have OCD when it comes to straight lines and lining things up perfectly. If that's not you, you can skip ahead to Step 5. To start, you will want to make sure you can view rulers. To do so, click on View > Rulers (there should be a &#x2713 next to the Rulers line) {A quick keyboard shortcut, just press Ctrl+R}

Step 3:
Now you will see the rulers along the top and left hand side of your screen. Next, you will want to view the grids. Click on Edit > Preferences > Guides, Grids, and Slices {A quick keyboard shortcut, just press Ctrl+K, then Ctrl+6} 

Step 4:
What works best for me is a gridline at every inch, with 4 subdivisions. Apply these settings to the screen.


You will then have a project that looks like this:
If it doesn't look like this, try adjusting your view settings to allow grids to appear. Click View > Show > Grid (there should be a &#x2713 next to the Grid line) {A quick keyboard shortcut, just press Ctrl+'}

Step 5:
Now comes the fun part, adding your words! Use your creativity here. Any size, direction, font, etc. it's up to you! Here is the rough layout of my design

Step 6:
The last step I use is to adjust the kerning and spacing on certain fonts and sizes to make it look just right!
To do so, you have to show the character window. Click Window > Character (there should be a &#x2713 next to the Character line). Here is a final with some adjustments to font widths and heights and spacing!


Monday, June 10, 2013

Money Saving Monday #24


Hobby Lobby

  • Becky Higgins Project Life 30% off
  • Punches & Punch Sets 40% off
  • Glass Beads 50% off
  • Summer items 50% off


Monday, June 3, 2013

Money Saving Monday #23

Hobby Lobby

  • All items labeled Summer, 50% off
  • All items labeled Spring, 50% off
  • Caron One Pound Yarn $6.99
  • Duck Canvas $7.69/yd
  • Tim Holtz Distress Stains $2.99